Supplies:
- all your sewing stuff
- elastic – I used 1/2 inch, but you can go bigger or smaller
- old shirt

So this is the shirt I started with. If you look in the comments at my picture, that is the shirt I am wearing ![]() . I started by putting the shirt on my little girl and seeing how much I would want to
take off the sides, arms, and neckline. You may have to use your imagination. Just pretend you’re a tailor for a minute and really look at where you will need to make
adjustments. I was lucky, the length was perfect, and the sleeve length was just right as well. You may have to hem yours, just fold things up a bit to see what looks good and what
doesn’t. I decided I need to take about two inches off each side, and just a little under the arm.
. I started by putting the shirt on my little girl and seeing how much I would want to
take off the sides, arms, and neckline. You may have to use your imagination. Just pretend you’re a tailor for a minute and really look at where you will need to make
adjustments. I was lucky, the length was perfect, and the sleeve length was just right as well. You may have to hem yours, just fold things up a bit to see what looks good and what
doesn’t. I decided I need to take about two inches off each side, and just a little under the arm.

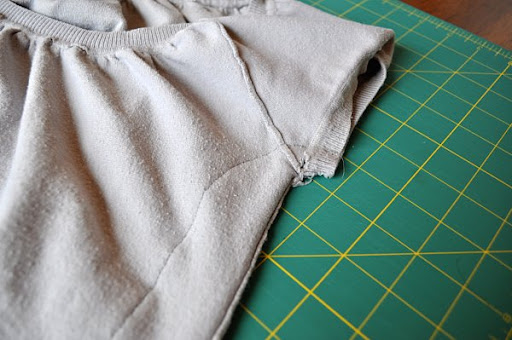
Lay the shirt down on a flat surface , with the wrong side out, and make sure you have smoothed out the fabric so that all the seams are lined up. Pin if you need to, mark with a washable pen, or just sit down to the machine and sew. I started at the underarms and just sewed a continuous stitch all the way down the side. Then cut off the sides about a 1/4 inch from the seam. You could cut before you sew if you are using a woven fabric, but since I was working with knit, I cut after. Zigzag or serge your seam if you need to. Also if you are sewing on knit, use a slightly longer stitch length, this will give you a little stretch.
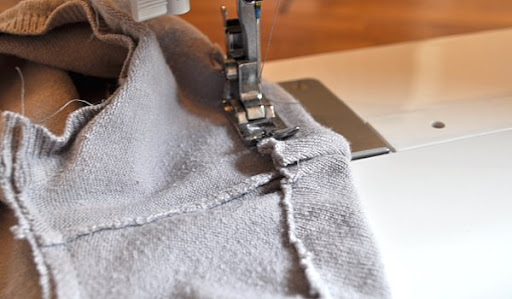
This gives you an idea of how I sewed under the arms. Before you go to the next step, you may want to try it on your little one and make sure you don’t need to make anymore adjustments.
Remember we’re playing tailor ![]() . That just made me think of that one
Friends episode…did you see that one? Too funny!
. That just made me think of that one
Friends episode…did you see that one? Too funny!

Now for the neckline. This will vary depending on the shirt you are using, but the idea is to make the neckline large enough that you can have a nice gather. For me that meant just cutting off the trim. Remember that you will be folding it under to make the casing for the elastic, so don’t cut off too much!

Now with the wrong side out, fold the neckline over large enough for seam allowance, and for the elastic. For me that meant folding it over 3/4 of an inch. Then sew around the perimeter, leaving a small opening to thread the elastic.

Now put a safety pin on the end of the elastic and thread it through. I would wait to trim the elastic to the length you need after you have threaded it. I didn’t and it was a pain to
keep it from slipping into the casing. So just leave it long until you have threaded it ![]() .
.

Now decide how big you are going to leave the neckline. I just held it up to my little one and adjusted until it looked right. Cut the elastic leaving an inch for sewing together. Just overlap the ends an inch and sew a zigzag, making sure to go back and forth a few times.
Now close up the opening, all done!

See, that was easy! I love doing projects with old clothes. I swear I have learned more from that than anything! So don’t let it scare you. You won’t be out anything but your time if it doesn’t work out, your fabric is already pre-washed, and you can experiment with all sorts of fabrics! If you have never sewn with knit, this is a great way to play around with it. So dig through your closet and find some old shirts you can cut up!

I am kind of in love with how this turned out too. She can wear it alone this spring…

Le blog: http://www.themotherhuddle.com